
These earrings are so simple to make, but use some good techniques. (Honestly, my 3-year-old helped me get a bridal order of these earrings ready. Think I should pay her?)
Once you get the hang of these, look at a few of your favorite pieces of jewelry- chances are they're made with similar techniques. Just think of the possibilities!
These supplies are readily available at your local craft store, or even Wal-Mart!
You could probably go pretty far with just a plain set of needlenose pliers from the toolbox, to practice with but I recommend getting a jewelry set from the craft store. A plain vanilla set costs about $10. These pliers have springs in them to keep them OPEN when at rest, which is much easier than pliers that are naturally CLOSED.
I'm using sterling silver elements, with Swarovski Crystal in the peridot color. The rondelles are Swarovski as well, crystal color. Also, you can use whatever earrings you prefer- the bride wanted leverback, so that's what we did!
Simple Drop Earrings
Ingredients for this tutorial:
(2) leverback earrings
(2) 8 mm round (5000 style) crystals
(4) 6 mm bicone crystals
(2) 6 mm crystal rondelles
(2) silver 2" head pins

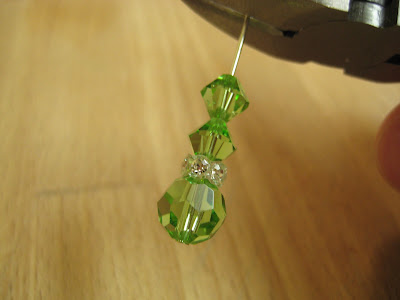
Start with one head pin, thread the beads in this order:
8 mm round
6 mm crystal rondelle
6 mm bicone
6 mm bicone

With your clippers, snip the head pin off about 3/8" above the last bead.
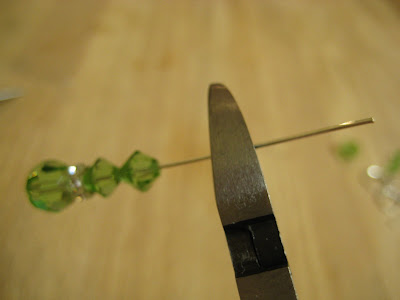
With your needlenose pliers, grasp head pin just above last bead, and bend at a 90 degree angle.


With your round-tip pliers, grasp the tip of the head pin, and curl tip up and into a curve, back to the 90 degree bend. You'll have to turn the pliers over at some point in that curve, unless your hand CAN turn around backwards.... regardless of how you do it (!!) leave the loop open just a smidge for the next step. (Oh, and please ignore how I'm holding the pliers- I was just trying to get them in front of the camera! Thanks.)


With your needlenose pliers, make sure the end is straight.

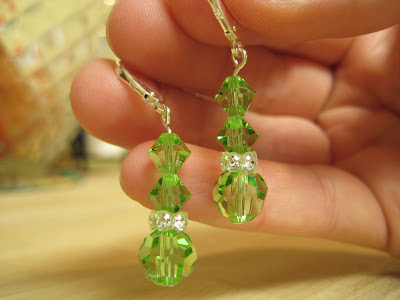
Hook your loop onto the ring at the base of your earring,
and pinch close with the needlenose pliers.


Repeat with remaining supplies, and enjoy!
-----

Myrnie is a stay-at-home, do-it-herself kind of Mom. She blogs at DIY Mama and I Wonder Woman.
All photo credits are Myrnie's.


